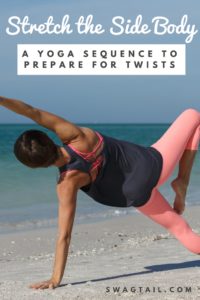
 I am a huge fan of taking yoga classes of all styles. The following sequence is inspired by a local Sarasota studio, Yoga from the Heart. The Iyengar-influenced approach taught there is done is an extremely safe way, and I just adore the mindful hands-on-adjustments by Lynn that give my practice an extra boost. Side body stretches, also known as lateral bends, have numerous benefits for the body and mind. These benefits include increased spine and torso flexibility, enhanced lung capacity, and reduced tension in the legs and low back. With your own expertise, you can tailor this sequence to meet the unique needs of your class or clients. Enjoy!
Photo: Casey Brooke Photography
SEQUENCE OVERVIEW
The goal of this sequence is to lengthen the sides of the body through a series gentle, attentive postures. This will then prepare the body for deeper lateral bends or twisting postures. As you guide students through the poses on one side of the body first, a significant contrast in the spine will be noticeable in just a few minutes time.
Instruct your students to remain still, and breathe for a few moments before moving on to the second side. This will allow your class to:
- Increase their body awareness, observing the contrast created on just one side
- Appreciate of the body, and the space created through moving it
- And, invite them to approach the same sequence on the second side with new eyes.
Many times in life we encounter the same environments, or engage with the same people. While the circumstances might appear familiar, there is always change within all things. This practice reminds students to cultivate awareness, on and off of the mat.On a practical note, this sequence will fit seamlessly into any warm up for a hatha or vinyasa class (or any other style you see fit). Want more heat? Add more movement. Want to focus more on alignment in each pose? Stay longer in them. The magic will come through your interpretation and implementation of these asanas.
Props, such as a block or blanket, is optional (but not necessary). Use of these props will be mentioned in each pose variation below.
Suggested Pranayama
Engage Ujjayi breath throughout the sequence. Remind students to imagine the breath is coming in and out through the back of the throat (even though they’ll be breathing through the nose the entire time). And, make each inhale long, deep, and controlled. Same goes for the exhale. Remember that strain, in any way, is avoided in yoga. This is also true of the breath. Strain can be noted in Ujjayi pranayama when students try to make this breath tooloud, and thus overuse the muscles of the throat. Have students practice Ujjayi breathing so that the breath is just audible to themselves.
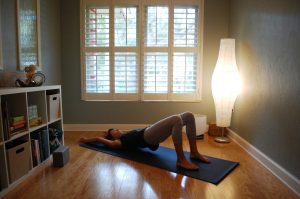
POSTURE 1: GENTLE CAT/COW FOR THE LOW BACK

Specific Instructions: While lying in bridge pose, have students move the spine in a gentle arching and rounding fashion. This is done by exhaling, and pressing the spine into the floor (the hips might lift slightly as this occurs). As they inhale, rock the pelvis forward and lift the low back away from the floor. As you may note in the video above, very little movement can actually be seem in the body. This is because the movements are very minor.
Purpose: This is a preparatory pose for what’s to come. It’s designed to start moving the spine. Start easy, and use this simple posture to help link body movements with the breath (a practice that will be woven throughout this side body sequence).
Length: Repeat 5-10 times.
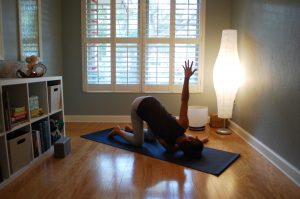
POSTURE 2: BRIDGE POSE
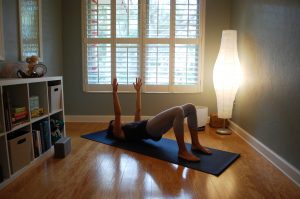
Specific Instructions: To get into bridge pose, also known as setu bandhu sarvangasana, press the floor away on the inhale and lift the hips away from the ground. Simultaneously, lift the arms up toward the ceiling. At the top of the inhale, the arms and hips will be at their maximum extension. The exhale will be used to lower the arms and hips back down to the ground, arms resting alongside the body again.
Purpose: Taking bridge pose here engages the muscular energy of the legs to build heat in the body. This also amplifies the extension of the spine. Adding the arm movements also engages the shoulder joint, which brings more balance to the entire body.
Length: Repeat 5-10 times.
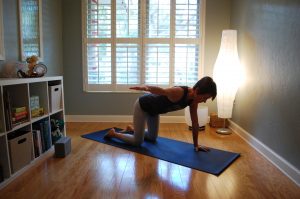
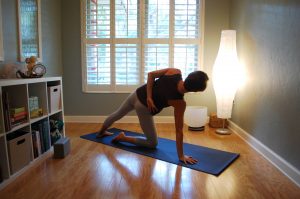
POSTURE 3: CAT/COW FROM TABLETOP POSITION
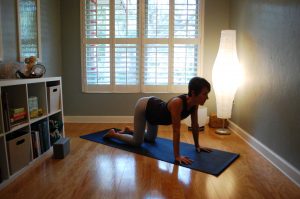

Specific instructions: With hips stacked over the knees, and the shoulders stacked over the wrists, movement in table top position will be well supported. Use the in-breath to tip the sitting bones back, drop the spine toward the floor, retract the shoulder blades, and look up. Follow with an exhale to tuck the chin, round the back, and tuck the tailbone. Make sure the fingers are spread wide and the base of each knuckle presses into the ground. Simultaneously, allow the tops of all ten toes to press down.
Purpose: This sequence mirrors the small movements done on the back moments ago, but it now allows for more range of motion. The weight bearing on the arms and legs also induces more heat to the body, and the element of balance while on the arms and legs warms up the core.
Additional support:
- Place blanket under knees
- Make fists for wrists, if any discomfort is present
Length: Repeat 5-10 times
POSTURE 4: THREAD THE NEEDLE
Specific instructors: Bring the spine to neutral, first. Move the left hand from under the left shoulder (position for cat/cow) to the centerline of the body (under the heart). When the right arm comes out to the side, make sure the right shoulder blade draws closer to the spine. Then, weave the right hand behind the left wrist and come on to outer right shoulder. Arm variations are described in the video above. Keep the hips over the knees, and in a squared position, the entire time. This often means drawing the right hip back in space.
Purpose: Thread the needle pose lengthens the right side of the body, and begins to incorporate that length into a twist. The degree to which your student optimizes that twist depends on the pressure applied with the left hand to the mat, or can use balance to help roll on to that outer right shoulder.
Additional Support:
- Place blanket under knees to add more cushion to the knee joint
- Place a blanket under the right shoulder to bring the ground up to you, making a twist more accessible for those with more limited flexibility
Length: Once in the posture, hold 3-5 rounds of breath
POSTURE 5: GATE POSE, VARIATION
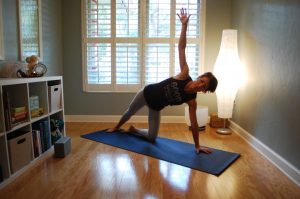
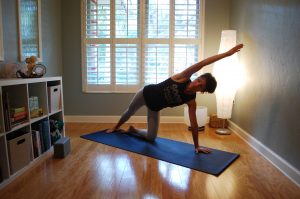
Specific instructions: Step the right foot back first, and swing the left shin back behind the body for additional balance. Hug the left shoulder into the socket, and keep the left side of the body long as the right arm lifts off of the ground. The top arm can extend toward the ceiling, reach overhead (like extended side angle), or take a half bind behind the back.
Purpose: This further lengthens the right side of the body, and adding a right arm overhead increases this stretch even more. Adding a half-bind with the top arm helps open up the right side of the chest as well. Since many twisting postures can be done with more effort than necessary, including twisting around the neck (instead of lower down in the spine), allowing the head to drop reminds your students to find ease in these side-lengthening and twisting postures. The core also continues to be engaged her just by being in this balancing posture.
Additional support:
- Place a block under left hand, if right side body is tight
- Make a fist with the left hand if the wrist is getting tired
- Length: 5 rounds of breath once in variation of choice
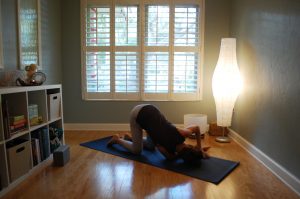
POSTURE 6: DOWNWARD FACING DOG, VARIATION
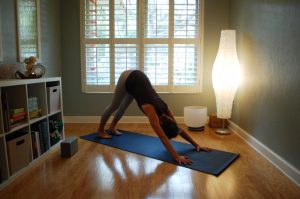
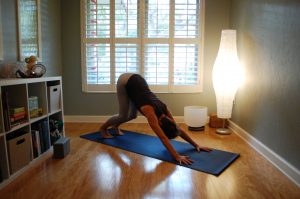
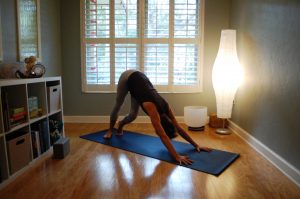
Specific instructions: Lift the hips up and back, lengthening the spine and hamstrings. To stretch the outer right hip and side body more specifically, bend both knees. Then, externally rotate the right leg and place the outer edge of the right foot on the ground (see video above). The shoulders are to remain square the entire time. Relax the head as much as possible.
Purpose: The lateral hip and lateral hamstrings are also involved in many lateral bends and twists. Thus, flexibility in this area makes more challenging poses more accessible. Staying in Adho Mukha Svanasana the entire time builds tapas, or heat, in the upper body while stretching the lower.
Length: Hold 5 rounds of breath
POSTURE 7: DOWNWARD FACING DOG / PLANK MOVEMENTS
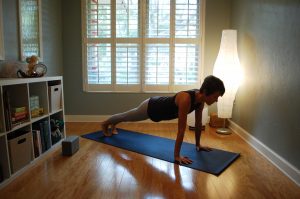
Purpose: Part of a warm up in a yoga practice involves attaching the mind to the body, and continuous movement can help with that. Depending on the age and ability level of your class, have your students take a few rounds of down dog, on the exhale, and plank pose, on the inhale. The previous version of cat/cow from tabletop position is also a nice, easier option to still keep the body moving with the breath.
Length: Complete 3-5 rounds of each posture
POSTURE 8: BOUND ANGLE, VARIATION
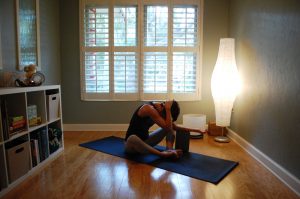
Specific Instructions: Bring the soles of the feet together, with knees wide. Keep the spine long, as both sitting bones ground down into the mat. Keep this spinal set up as the left forearm comes down on to a block, or the floor, in front of the left shin.
Purpose: Taking bound angle pose allows the adductors to now lengthen while the sides of the body continue to stretch. Opening the elbow toward the ceiling, with the head back in the hands, is an open version of the twist. Taking the right elbow toward the left shin, closes the body and twists inward. Again, this is moving the spine in a twisting fashion, while memorizing the pattern of an elongated spine.
Additional support:
- Use a block under the left forearm if the floor is far away
- Sit on a blanket if doing so on the mat is uncomfortable
Length: Take a few rounds of breath sitting tall, then take 5 rounds of breath to move the body. Hold 3-5 breaths in the open twist before coming back to center.
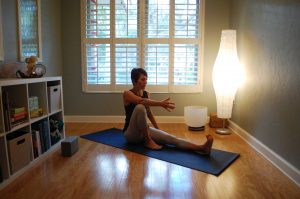
POSTURE 9: STAFF POSE, DANDASANA
 Specific Instructions: Ground down through both sitting bones. Feel the legs lengthen away from the hips, flex the feet and lengthen the hamstrings.
Purpose: The spine returns to a symmetrical position in this posture. It’s a neutral place in which the mind can already notice a difference side-to-side, and increase the capacity of breath once again if it had been diminished in the previous, challenging pose.
Additional Support:
- Sit on a blanket, if needed
- Place a blanket under the knees, if more support is necessary
- Bend the knees if the low back and hamstrings are tight.
Length: Hold for 3-5 breathes
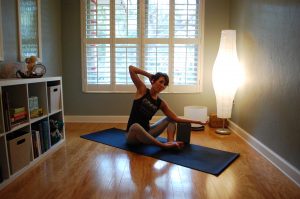
POSTURE 10: MARICHYASANA A, VARIATION
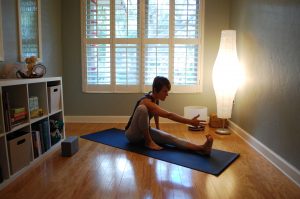
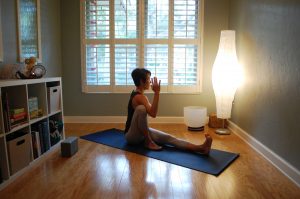
Specific Instructions: Bend the right knee, and place the sole of the right foot on the floor inside of the left thigh. Bring the left fingertips to the floor, outside of the left hip. Inhale to lengthen the spine. Reach the right arm out in front of the body, parallel to the floor. Fold forward slightly, and reach the right arm toward the front of the mat (on the inside of the bent right leg). Then, hug that right shoulder back and in, as students sit more upright again. Then, twist open to the left. The inner right thigh presses into the outer right arm, and the left fingertips can now reach behind the body. Keep the head and neck relaxed, and twist from the core.
Purpose: By reaching forward with the right arm, the serratus muscle engages. By reaching back with the right shoulder blade, the rhomboid does. Both of these muscles are utilized in twists, to help students go deeper. The movement warms them up. The hold allows them to engage appropriately to twist open to the left. This open twist also continues to open the right side of the body, since length here is needed to twist over to the left.
Length: Move for 5 rounds of breath, then hold the open twist for 5 breath cycles.
POSTURE 11: PLANK, THEN TO DOWNWARD FACING DOG
Specific Instructions: Press the floor away. Lengthen both sides of the body, as the hips reach up and back. Let the head remain heavy.
Purpose: The goal here is to neutralize the spine again, and find a comfortable position from which to observe the changes made in the body during the first half of the sequence.
Additional support:
- Rest in child’s pose, a great neutral position to regain focus and relax the arms and wrists
- Build more heat by coming into plank on the inhale, and back to down dog on the exhale
- Bend the knees if hamstrings still are tight
Length: Hold for 5 inhales and exhales, each.
REPEAT THE ENTIRE SEQUENCE ON THE SECOND SIDE
Now that this sequence of side-bending postures has been completed on the first side, lengthening the entire right side of the body, it’s time to create balance by repeating the sequence on the left. Placing numerous postures in a sequence such as this can really highlight the powerful changes in the body that result from focused movement. Ujjayi breathing throughout also adds a meditative component to the process. It soothes the nervous system. It trains the mind to be present in the moment, aware of the sensations in the body and the content of the mind.
Have fun with this process, and enjoy this warm up as a way to build a foundation for more lateral bends and twisting asanas later in your class sequence.


Leave A Comment