 Sciatica refers to pain that extends down the sciatic nerve and 40% of adults have a chance of experiencing it in their lifetime. It’s often caused by tension or injury in the low back or hips. Since most of your clients don’t get to work from their yoga mat (like you do), they have a greater likelihood of experiencing this condition. This home yoga sequence for sciatica is meant to be a resource you can provide for your students when they approach you for advice on how to alleviate their pain.
In fact, this post was created due to a client of mine asking for input. I told her I would send her some recommended links when I got home. Yet, when searching online, I found that the wide variety of resources out there did not offer a succinct home remedy. They often showed poses to minimize discomfort but did not put the postures in a knowledgeable sequence. Nor did they explain why the postures were best utilized in the way they recommended.
My goal is that you now have a great resource to share with your clients. There’s also a one-page sheet you can print out and give to them as needed.
WHAT IS SCIATICA?
Sciatica refers to pain that extends down the sciatic nerve. This is the longest nerve in the body, and it starts at the lumbar spine and branches down each leg ending roughly just below the knee. Sciatica can be triggered by a herniated disk, bone spur, or compression in the lumbar spine.
Tight muscles of the hip, especially the piriformis, can also initiate sciatica. Since the sciatic nerve passes next to, and sometimes through, the piriformis, attention to hip flexibility can minimize or prevent sciatic pain.
The piriformis muscle can get tight from long periods of inactivity (such as sitting all day at work). If the piriformis gets injured from excessive exercise, heavy lifting, or stair climbing, it can also push down on the sciatic nerve.
Sciatic Symptoms
While sciatica often only affects one side of the body at a time, the symptoms can be excruciating. Client suffering from sciatica can complain of:
- Sharp, shooting, or burning pain that radiates through the buttocks and down the back of the leg
- Dull, achy pain through the same areas above
- Weakening, or numbness, in the affected leg
- Trouble standing, sitting, or even sleeping due to their discomfort
- Intensified pain with sudden movements or even by coughing or sneezing

Photo Credit: Natural Remedies
ABOUT THIS SEQUENCE
This is a short and sweet yoga sequence for sciatica, designed to be utilized frequently at home. Since nerves do not often directly respond to stretching, this sequence is designed to open the tense areas that increase pressure on the sciatic nerve itself. Plus, the incorporation of gentle movements can minimize irritation. The end result is designed to provide more comfort, ease, and spaciousness in the affected areas.
Props needed:
- A strap (or belt or tie)
- A wall space
Additional suggestions:
- Most of this sequence is done on your back. Make sure to have the necessary support beneath the body, whether it be a yoga mat with blankets or a carpeted surface.
- Place support behind the head and neck to reduce any effort on the upper body. This is especially true if the back of the head does not rest easily on the floor, or if the chin points up toward the ceiling when the head is on the floor.
- Go easy on yourself. This is designed to be part of a longer-term solution to reducing pain. Be kind to your body, and do this yoga sequence regularly for best results.
- Listen to your body in each pose.
- As always, work with a licensed medical professional when starting any new exercise routine.
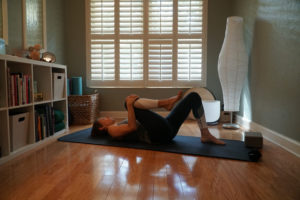
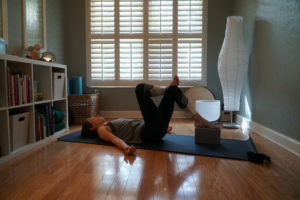
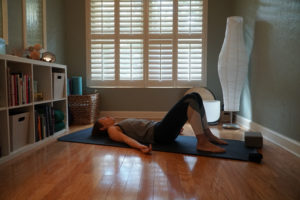
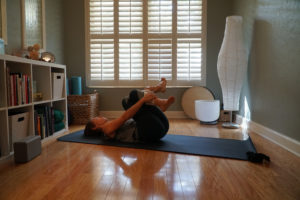
APANASANA (KNEES TO CHEST)
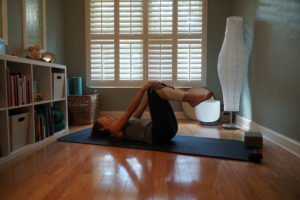
Purpose: This pose is a fantastic way to alleviate tension in the low back. Adding movement to this posture, such as gentle circular motions with the knees, can be one of the best ways to decrease pain associated with sciatica.
Length: 1 minute total (Circle the knees for 20 seconds in one direction, then 20 seconds in the other. Then, hold for a few deep cycles of breath.
Additional Support:
- Hold the back of the hamstrings, if bending the knees is too intense.
- Use a strap to wrap around the shins to make gripping the legs even more accessible.
- Place a blanket beneath the back of the pelvis to cushion this bony area.
Hug the knees wide toward the armpits instead of the center line of the body to provide more space to breathe. - You can also alternate keeping one foot on the floor if the sensation is too strong with both knees in at once.
When done with this pose, place both feet on the floor with the knees bent.
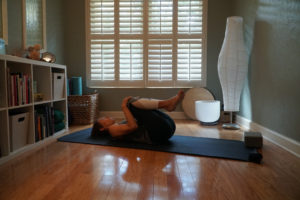
ALTERNATE KNEE TO CHEST
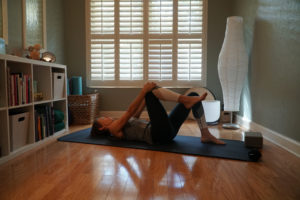
Purpose: Because the sciatic nerve originates at the low back, it’s important to spend some time initially reducing strain in this area of the body. This is essentially another version of apanasana done above, only with one leg held toward the chest at a time instead of both.
As you exhale, feel the bent knee draw closer to the body. As you inhale, soften your grip and feel the held leg move away from the torso. This gentle movement can further reduce pain in the low back.
Length: 1 minute total (30 seconds each side)
Additional Support:
- Hold the back of the hamstring of the bent knee, or with a strap, to loosen any tension at the knee joint.
- Support the back of the body with a blanket to provide more cushioning.
Once both sides are even, place both feet on the floor and grab your strap.
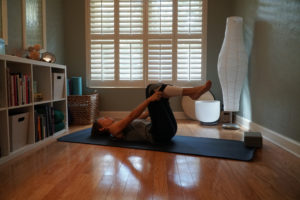
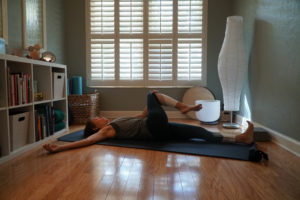
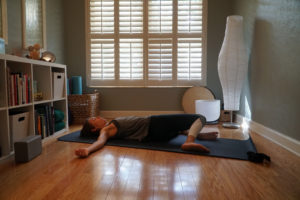
SUPTA PADANGUSTHASANA (WITH A STRAP)
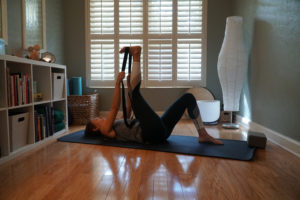
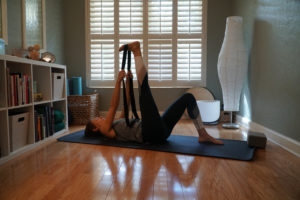
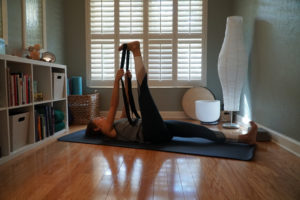
Purpose: Tight hamstring muscles can cause low back pain. Each of the three hamstring muscles originates at the sitting bones and, when tight, can cause an anterior (or forward tilt) of the pelvis. This, in turn, initiates a forward flexion of the low back and strain on the associated ligaments. If you loosen the hamstrings with supta padangusthasana, you can in turn orient the pelvis back to a neutral position and reduce strain at the low back as well.
Length: 2 minutes (1 minute each side)
Additional Support:
- Bend the knee on the extended, bound leg.
- Bend the knee on the non-bound leg.
- Relax your grip on the strap, and soften your fingers.
- Allow the back of the shoulders to rest on the floor, and straighten the arms as you hold the strap. This reduces the amount of muscular work needed to hold one leg up.
 Once done with both sides, pause for a moment in savasana to notice the difference in the back side of the body. You can keep both knees bent if that makes the pose more accessible.
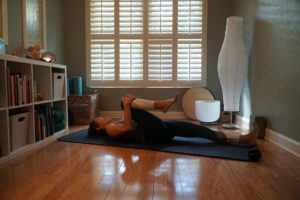
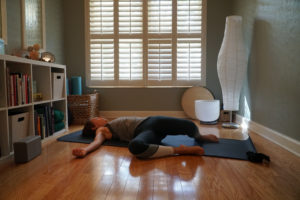
RECLINED SPINAL
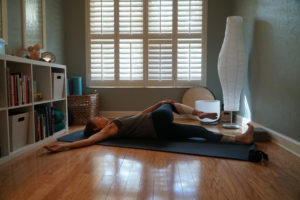
Purpose: Jathara Parivartanasana, also known as a reclined spinal twist, is a simple stretch that loosens your gluteal and piriformis muscles. Since inflammation in these areas can press down on the sciatic nerve, it’s best to lengthen these muscles and reduce that pressure.
Length: 2 minutes total (1 minute each side)
Additional Support:
- As you pull your bent knee across the body, keep the backs of both shoulders grounded. This may cause you to twist a bit less with the spine.
- Place a block or blanket under the bent knee.
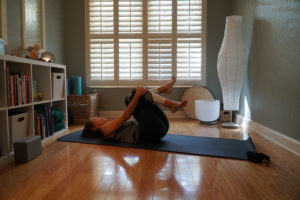
RECLINED PIGEON
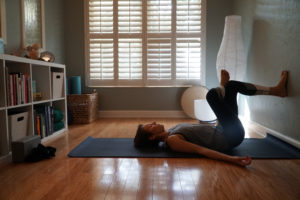

Purpose: As mentioned earlier, the sciatic nerve runs very close to the piriformis muscle. Externally rotating the hip, and creating space in the piriformis, can reduce tension on the sciatic nerve. Taking this reclined pigeon pose is also more supportive for the low back.
Length: 2 minutes total (1 minute each side)
Additional Support:
- One ankle will cross over the opposite thigh. To loosen the load on the supporting leg, place one foot on the wall. This also helps for those less flexible in the hips.
- Instead of a wall, place the bottom foot on a block.
- Hold the hamstring of the supportive leg, instead of the shin, to lessen the intensity of the stretch.
As a counter pose, you might want to bend the knees and place both feet on the floor. You can then drop the knees side-to-side in a windshield-wiper fashion.
SUPTA GOMUKHASANA

Purpose: This is the third pose in a row to target a release of piriformis muscle tension. And, since you’re still in the reclined position, there is no additional strain on the low back.
Length: 2 minutes total (1 minute each side)
Additional Support:
- The easiest version of the posture is to simply hold the knees.
- Use a strap around the shins, if grabbing the knees is inaccessible.
- Keep the feet flexed to protect the knees.
Again, when done, you can move the knees back and forth in a windshield wiper motion. You might also enjoy happy baby pose, to open the hips. If you select the second option, please make sure to move around a bit, rocking side to side or moving the legs as well.
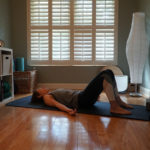
SHALAMBHASANA (VARIATION)
Purpose: Now that that the low back, hips, and hamstrings have been stretched, it’s time to work on strengthening areas that can prevent sciatica from occurring in the first place. Shalambhasana helps engage the low back and hamstrings. This trains the pelvis and spine to remain in a neutral position. Plus it tones all of the core muscles, which provides additional support for the spine.
Length: 1 minute
Dynamic movement:
- As you exhale draw your belly button toward your spine and press the tops of the feet into the floor (engaging the legs).
- As you inhale, lift your torso and right leg off of the floor. The left leg, and front of the pelvis, will remain in contact with the floor for support.
- Exhale, replace the torso and right leg down.
- Inhale, lift the torso and left leg. Right leg will remain grounded.
- Exhale, release the entire body back to the floor.
- Repeat for 1 full minute.
Additional Support:
- Place your fists under your forehead for support.
- Relax the shoulders down the back.
- Keep the chin slightly tucked to keep the back of the neck long.
When done, relax the entire body to the floor. Turn your head to one side, if comfortable. Bend the knees, and shift the shins side to side in windshield wiper motions from the prone position.
TABLE TOP EXTENSION
Purpose: Table top is another way to build strength after creating length in the body. Feel free to take a few rounds of cat and cow pose to mobilize the spine. You could even roll the torso around in circles while here before coming back to a stationary position with a neutral spine.
This posture engages all of the musculature around the spine. By extending the arm and leg in opposite direction, you also focus on lengthening the entire vertebral column. The space you are creating can prevent impingement in the future.
Length: 2 minutes total (about 45 seconds each side, with time to move the spine first)
Additional Support:
- Place a blanket under the knees for support
- Only lift the leg if balance is an issue.
- Make fists with the supporting wrists if any tension is experienced with the palms flat.
- Keep pressing down through the base of each knuckle to evenly distribute weight in the hands.
When done, roll over on to your back and reach for your feet. Here you’ll find happy baby pose to open the hips. If you select the second option, please make sure to move around a bit, rocking side to side or moving the legs as well.
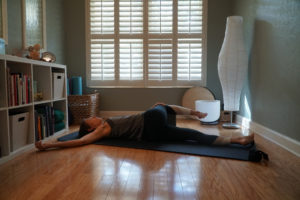
SAVASANA
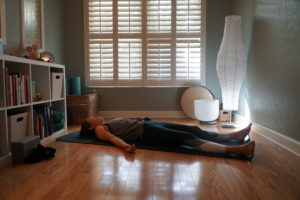 Purpose: This last minute is designed to internalize the changes made to your body from the last 14 minutes of targeted activity. Notice how you feel different. Observe any sensations in the back, hips, and legs. Let the body recline as comfortably as possible, allowing every muscle to relax.
Length: 1 minute
Additional Support:
- Take legs up the wall if you want a deeper relaxation.
- Bend the knees if there is still strain at the low back.
- Place a blanket over your body, or socks on your feet, if you feel cold.
PUTTING IT TOGETHER
When you’re working with a mixed population in your yoga classes, there is a high probability one of your clients will experience sciatic pain. This home yoga sequence for sciatica is a great resource you can pass on to them for homework. Your preparedness will be another way you demonstrate your knowledge and professionalism. And, it will reflect that you care about their well being–when they’re with you in person and when away immersed in their busy lives.


Leave A Comment